Learn Excel With Mr Excel Part 1: Introduction & Excel Environment

Liên hệ QC

ptm0412

Bad Excel Member
Thành viên BQT
Administrator
Tham gia
4/11/07
Bài viết
13,778
Được thích
36,278
Donate (Momo)
Donate
Giới tính
Nam
Nghề nghiệp
Consultant
Introduction
In GPE Library, we have the Ebook "Learn Excel With Mr Excel" in English. It contains most problems we would face during using Excel, and the way to solve them.
Now I try to translate it into Vietnamese in order to help all of us to increase our knowledge about Excel.
As the Author said:
If you ever find yourself on a case study where I tell you to do something without explaining how to do it, please send me an e-mail to yell at me for not being clear.
I believe that this book is useful because it was written clear enough for us to learn. So the only thing is my ability in translating, then I would like you to give me your comment.
Thanks a lot.

Trong thư viện của GPE có 1 Ebook "Học Excel với Ngài Excel" bằng tiếng Anh. Trong đó nêu lên những vấn đề chúng ta thường gặp khi sử dụng Excel , và cách giải quyết những vấn đề đó.

Nay tôi cố gắng dịch sách này ra tiếng Việt nhằm giúp mọi người cải thiện bổ sung thêm kiến thức Excel của mình.

Như tác giả từng tuyên bố:
Nếu có khi nào bạn tìm thấy trong sách này, bất cứ trường hợp nào mà tôi muốn bạn làm chuyện gì mà không giải thích rõ ràng cách làm, thì cứ gởi Email đến và mắng vào mặt tôi rằng tôi viết không rõ ràng.

Tôi tin rằng sách này hữu ích vì nó được viết dễ hiểu và rõ ràng.
Vấn đề còn lại là khả năng dịch của tôi có truyền tải hết hay không, mong các bạn góp ý cho.
Xin cám ơn các bạn

LEARN EXCEL WITH MR EXCEL
INTRODUCTION
I am a comic book superhero. At least, I play one at work. As the mighty man of macro, I have the coolest job in town: playing MrExcel, the smartest guy in the world of spreadsheets. Well, yes, that is a lot of hype. I am not really MrExcel. In fact, there are so many different ways to do the same thing in Excel that I am fre­quently shown up by one of my own students. Of course, I then appropri­ate that tip and use it as my own!
I have incorporated some of these discoveries in a pretty cool 45­minute seminar on Power Excel Tips. This is amazing stuff, like pivot tables, autofilters, and automatic subtotals. I love to be in front of a room full of accountants who use Excel 40+ hours a week and get oohs and ahhhs within the first 90 seconds. I have to tell you, if you can make a room full of CPAs ooh and ahh, you know that you’ve got some good karma going. At that point, I know it will be a laugh-filled session and a great 45 minutes.
I also teach a much longer six-hour version of the Power Excel class at the University of Akron. This is a hands-on class where everyone gets to try each tip on his or her own computer.

Tôi là 1 kẻ hài hước. Ít nhất, tôi có 1 việc để làm. Như 1 gã đàm ông to lớn, tôi lại có 1 công việc nhạt nhẽo trong phố: chơi với Mr Excel, 1 gã thông minh nhất trong thế giới các bảng tính.
Thôi được, đúng là có cường điệu một tí. Tôi thực sự không phải là Mr Excel. Thực ra có nhiều cách để xử lý cùng 1 việc trong Excel mà tôi thường xuyên được cho thấy bởi 1 trong các học trò của tôi. Tôi liền chộp lấy những cái ấy và coi như của mình.
Tôi đã tập hợp 1 mớ những khám phá này vào 1 bài thuyết giảng 45 phút về các ứng dụng mạnh của Excel. Đó là những chuyện lạ kỳ như Pivot Table, Auto Filter, và Auto Sub-Total. Tôi khoái cái chuyện đứng trước 1 khán phòng chật ních các tay kế toán, những kẻ sử dụng Excel trên 40 giờ 1 tuần, mà chỉ có há hốc mồm mà ồ và ah suốt 90 giây đầu tiên. Tôi phải nói với các bạn rằng, nếu bạn có thể làm cho nguyên 1 phòng những khán giả chỉ có oh và ah, bạn sẽ cảm thấy sung sướng biết nhường nào. Ngay kúc ấy, tôi biết ngay rằng sẽ là buổi thuyết trình đầy ắp tiếng cười và là 45 phút tuyệt vời của tôi.
Tôi cũng đã dạy 1 bài hơn 6 giờ đồng hồ về sức mạnh của Excel tại trường Đại học Akron. Đó là 1 lớp học thực hành ở đó mỗi học sinh thử thực hành mọi bài giảng trên máy tính của họ.

One of these classes, which I was presenting at the Greater Akron Chamber, provided the Genesis moment for this book. One of the ques­tions from the audience was about something fairly basic. As I went through the explanation, the room was silent as everyone sat in rapt attention. People were interested in this basic tip because it was some­thing that affected their lives every day. It didn’t involve anything cool. It was just basic Excel stuff. But, it was basic Excel stuff that a room full of pretty bright people had never figured out.
Think about how most of us learned Excel. We started a new job where they wanted us to use Excel. They showed us the basics of moving around a spreadsheet and sent us on our way. We were lucky to get five minutes of training on the world’s most complex piece of software!

Một trong các lớp này, ở Greater Akron Chamber, cung cấp ý tưởng cho việc viết cuốn sách này. Một trong những câu hỏi của thính giả, hỏi về 1 vấn đề khá là cơ bản. Khi tôi giải thích, cả phòng lặng yên như thể mọi người chết lặng trên ghế để lắng nghe. Người ta quan tâm đến các vấn đề cơ bản vì đó là những cái xảy ra trong cuộc sống hàng ngày của họ. Nó chẳng bao hàm cái gì nhạt nhẽo khô khan. Đó chỉ là những kiến thức Excel cơ bản. Nhưng là loại cơ bản mà cả 1 phòng đầy những nhân vật xinh đẹp, sáng láng chưa bao giờ nghĩ tới.
Hãy thử nghĩ lại xem phần lớn chúng ta học Excel như thế nào. Chúng ta bắt đầu đi làm ở 1 vị trí mà người ta yêu cầu chúng ta phải sử dụng Excel. Họ chỉ cho ta cái việc cơ bản là đi daọ quanh các bảng tính vá tống chúng ta vào con đường chúng ta đang đi. Chúng ta may mắn đã có được 5 phút để làm quen với 1 trong những phần mềm tính toán phức tạp nhất thế giới!

Here is the surprising part of this deal. With only five minutes of training, you CAN use Excel 40 hours a week and be productive. Isn’t that cool? A tiny bit of training and you can do 80 percent of what you need to do in Excel.
The problem, though, is that there are lots of cool things you never learned about. Microsoft and Lotus were locked in a bitter battle for market share in the mid-90s. In an effort to slay one another, each suc­ceeding version of Excel or Lotus 1-2-3 offered INCREDIBLY powerful new features. This stuff is still lurking in there, but you would never know to even look for it. My experience tells me that the average Excel user is still doing things the slow way. If you learn a just couple of these new tips, you could save two hours per week.

Đây là phần gây ngạc nhiên nhất của câu chuyện. Với chỉ 5 phút làm quen với Excel, bạn có thể làm việc 40 giờ 1 tuần và làm việc trở nên có hiệu quả. Chẳng phải là thú vị sao? Một tí xíu thực hành và bạn có thể làm đến 80% những gì cần thiết để sử dụng Excel.
Dù vậy, vấn đề ở chỗ có nhiều thứ bạn chưa hề được học. Microsoft và Lotus đã từng lún sâu vào 1 cuộc chiến giành thị trường vào giữa những năm 90. Trong 1 cố gắng nhằm hạ gục đối thủ, mỗi bên đưa ra những phiên bản Excel và Lotus 1-2-3 cung cấp những công cụ mạnh mẽ không ngờ được. Những tiện ích được ẩn giấu trong đâu đó, và bạn sẽ chả bao giờ biết đến ngay cả khi bạn bỏ công tìm nó. Kinh nghiệm cho tôi biết rằng 1 số lượng trung bình những người dùng Excel đang làm bằng những phương cách chậm chạp. Nếu bạn học được chỉ cần 2 trong số những thủ thuật dưới đây, bạn sẽ tiết kiệm ít nhất 2 giờ mỗi tuần.

 
LEARN EXCEL WITH MR EXCEL
INTRODUCTION (Continued)
So, here is the plan. I have set out to write a book that talks about 277 of the most common and irritating problems in Excel. You will find each of these 277 items (which you have been stumbling over ever since your “five minutes of training”) followed by the solution or solutions you need to solve that problem. A lot of these topics stem from the questions that were sent my way in seminars I’ve taught. They may not be the coolest tips in the whole world, but if you master even half of these con­cepts, you will be smarter than 95 percent of the Excel users in the world and will certainly save yourself several hours per week.
In each chapter, a problem and its solution will be discussed. There are plenty of books that go through all of Excel’s menus in a serial fash­ion. The trouble with those books is that you have NO CLUE what to look up when you are having a problem. The last time I checked, no one at my dinner table ever used the word “CONCATENATION”, so why would anyone ever think of looking up that word when they want to join a first name in column A with the last name in column B?

Và đây là kế hoạch: Tôi đã viết 1 cuốn sách nói về 277 trong số những vấn đề chung nhất và những vấn đề khó chịu của Excel. Bạn sẽ thấy mỗi cái trong số 277 mục, mà bạn đã từng vấp phải từ khi bạn có “5 phút huấn luyện”, sẽ kèm theo là 1 hoặc nhiều biện pháp để giải quyết. Phần lớn các đề mục bắt nguồn từ những câu hỏi phát sinh trong các bài thuyết giảng của tôi. Đó có thể không phải là những vấn đề lớn trên toàn thế giới, nhưng nếu bạn nắm vững dù chỉ 1 nửa những kỹ thuật này, bạn sẽ trở nên thông minh hơn đến 95% những người dùng Excel khác trên thế giới, và bạn sẽ tiết kiệm được khá nhiều giờ trong số 40 giờ làm việc trong tuần.
Trong mỗi chương, 1 vấn đề và các biện pháp giải quyết sẽ được thảo luận. Có nhiều sách nói về Excel thông qua các Menu theo những cách khác nhau. Vấn đề của những cuốn sách đó là bạn sẽ không có hướng để biết cái cần tìm khi gặp khó khăn. lần cuối tôi khảo sát trong 1 bữa ăn, kết quà là chưa ai từng sử dụng từ “CONCATENATION”, do đó chưa ai có ý định đi tìm từ đó khi họ muốn nối Họ trong cột A và Tên trong cột B.

I expect this book will be a quick read. You can probably skim all 277 topics in a couple of hours to get a basic idea of what is in here. When you face a similar situation, find the case study, apply it to your own problem, and you should be all set.
This book takes a different approach than others I have tried to use. I am MrExcel, but I am hopelessly clueless with PhotoShop. Wow! This is an intimidating program. I own a ton of books on PhotoShop. There must be a bazillion toolbars in there. Most books that I pick up tell me to press the XYZ button on the ABC toolbar. I can’t even begin to figure out where that toolbar is. I hate those books. So, my philosophy here is to explain the heck out of things. If you ever find yourself on a case study where I tell you to do something without explaining how to do it, please send me an e-mail to yell at me for not being clear.

Tôi mong rằng cuốn sách này sẽ là 1 cuốn sách đọc nhanh. Bạn có thể chỉ lướt qua 277 mục trong 2 giờ đồng hồ, để có 1 cái nhìn tổng quát những gì có trong đó. Khi bạn đối diện với 1 vấn đề tương tự, tìm 1 trường hợp tương tự đã học, áp dụng vào vấn đề của bạn, và rồi tất cả sẽ được êm xuôi.
Cuốn sách này tạo 1 cách tiếp cận mới hơn những sách tôi đã từng viết. Tôi là Mr Excel và tôi kinh hãi 1 cách vô vọng với Photoshop. Đây là 1 phần mềm đáng sợ. Tôi có cả đống sách về Photoshop. Có phải đến cả tỷ những thanh công cụ trong đó. Phần lớn các sách đều chỉ cho tôi hãy nhấn nút XYZ nàm đó trên cái thanh công cụ ABC nào đó. Tôi không thể nào thậm chí biết được cái thanh công cụ đó nằm ở đâu. Tôi ghét loại sách đó. Ví vậy luận thuyết của tôi ở đây là giải thích cụ thể các khái niệm. Nếu có khi nào bạn tìm thấy trong sách này bất cứ trường hợp nào mà tôi muốn bạn làm chuyện gì mà không giải thích cách làm, thì cứ gởi Email đến và mắng vào mặt tôi rằng tôi viết không rõ ràng. (Các soạn giả VN có ai dám tuyên bố thế không nhỉ? – ptm0412)

Conventions Used in the Book
Each chapter will start with a problem and then a strategy for solv­ing the problem. Various chapters may offer additional details, alter­nate strategies, results, gotchas, and other elements as is appropriate to the topic. Each chapter wraps up with a summary and a list of any Excel commands or functions used in the chapter.
I hate books where the text refers to a figure that is on the next two page spread. In the interest of readability, I’ve chosen to allow white space at the bottom of the right-hand page if it will allow the text and figure to remain together. This is a conscious decision. I’m not trying to pad the page count or increase the cost of paper in the book. I believe this layout will maximize the ease of use of the book.

Cách thể hiện bài trong sách này:
Mỗi chương sẽ mở đầu bằng 1 vấn đề bạn có thể gặp, kế đến là phương pháp giải quyết. Khá nhiều chương sẽ cung cấp những chi tiết kèm thêm, những phương pháp khác nhau, kết quả, và những yếu tố thích hợp với chủ đề. Mỗi chương sẽ kết thúc bằng 1 đoạn tổng kết và 1 danh sách các hàm, các lệnh đã sử dụng trong chương đó.
Tôi ghét những sách mà bài viết nói đến 1 hình minh hoạ, mà hình đó nằm ở trang khác. Nhằm mục đích dễ đọc, tôi thường bỏ trắng cả phần dưới của 1 trang nếu thấy cần thiết cho bài và hình minh hoạ nằm kế nhau. Đây là 1 quyết định có ý thức. Tôi không cố kéo cho số trang nhiều lên hay làm cho giá thành sách cao vì tốn giấy. Tôi chỉ tin rằng phân trang như vậy sẽ làm dễ dàng cho người đọc.
 
PART ONE: THE EXCEL ENVIRONMENT
SHOW FULL MENUS ALL THE TIME
LUÔN HIỆN MENU ĐẦY ĐỦ

Problem: You are trying to learn Excel. Microsoft only shows you the most common menu choices under each menu.
Vấn đề: Bạn đang muốn học Excel. Microsoft chỉ hiện cho bạn thấy những mục thường dùng trong mỗi menu chính.
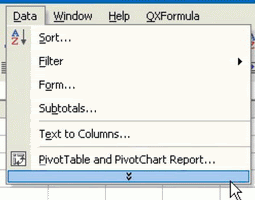
Fig. 1 shows a menu from one computer on my desk.
Hình 1 cho thấy Menu trên máy tính trên bàn làm việc của tôi.

Fig1-01.gif


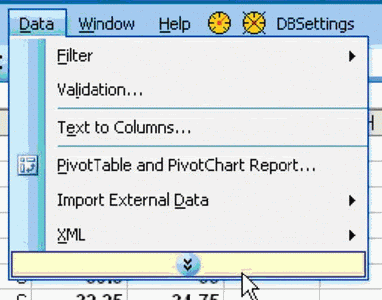
Fig. 2 is a screenshot from another computer on my desk.
Hình 2 là Menu trên 1 máy tính khác cũng trên bàn làm việc của tôi

Fig1-02.gif


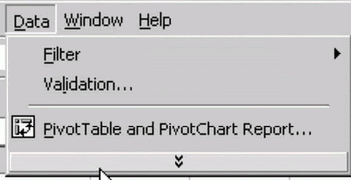
A screenshot of the data menu of the third computer on my desk is seen here in Fig. 3.
Menu Data của 1 máy khác được thấy trong hình 3

Fig1-03.gif


Fig. 3

This is maddening. How can you learn that there is a Sort option under the Data menu if Excel will not show you all of the options? Furthermore, Microsoft customizes the menu on the basis of items you use regularly.
First, this is insane; you cannot learn to regularly use something if you don’t know it is there. Second, when you go to a new computer, one of the options that you think should be there may not show up. It is very difficult to learn Excel when the menus are not consistent across com­puters.
Strategy: Turn off Adaptive Menus. This will show you the complete menu every time that you access that menu. Follow these steps:

Cái này thực sự bực mình. Làm sao mà bạn học được rằng có những chọn lựa trong Menu Data nếu nó không cho bạn thấy hết những chọn lựa đó. Hơn nữa, Microsoft còn tùy biến cái Menu dựa trên những cái nào bạn dùng thường xuyên.
Trước hết, cái này là điên, bạn không thể học để sử dụng thường xuyên cái gì nếu bạn không biết nó ở đâu.
Thứ hai, khi bạn sang làm việc ở 1 máy tính khác, 1 trong những mục của Menu bạn nghĩ nó phải ở chỗ đó chỗ nọ, thế mà nó lại không hiện ra. Rất là khó để học Excel khi những Menu không hiện diện như nhau ở mọi máy tính.

Giải pháp: Tắt phứt cái gọi là tuỳ biến cho Menu. Nó sẽ thể hiện Menu đầy đủ bất cứ lúc nào bạn gọi đến nó. Làm theo các bước sau:
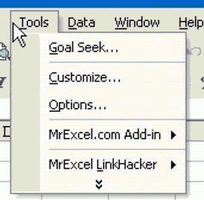
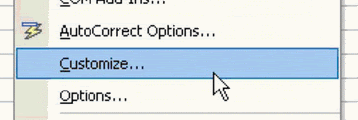
1) Go to the Tools menu, as shown in Fig. 4.
1. Vào Menu Tools:

Fig1-04.gif


Fig.4

2) If the Customize option is not shown, select the double-down arrow at the bottom of the list in order to expand the menu.
3) Select Customize… from the Tools menu, as shown in Fig. 5.

2. Nếu dòng Customize không hiện ra, click vào cái mũi tên đôi chỉ xuống ở đáy danh sách để mở rộng cái Menu ra.
3. Chọn Customize trong Menu Tools như hình 5.

Fig1-05.gif


Fig. 5

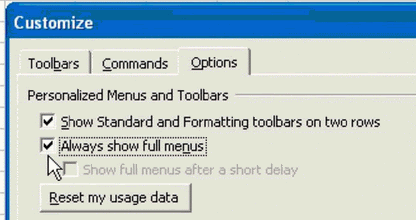
4) As you will see in Fig. 6, there are three tabs across the top of the Part Customize dialog. Choose the Options tab and then choose the box for Always Show Full Menus.
4. Như bạn thấy trong hình 6, có 3 tab bên trên cái dialog mới xuất hiện. Chọn tab Options và click chọn Always Show Full Menu.

Fig1-06.gif


Fig. 6

Additional Details: If you are in the process of learning Excel, it also helps to choose the Show Standard and Formatting Toolbars on Two Rows option. This will enable you to see all of the icons on the important Standard and Formatting toolbars. In Excel 2000, this setting appears as Standard and Formatting Toolbars Share One Row. In that version, you will want to uncheck the option.
Gotcha: Changing this setting in Excel will also affect Word and other Office products. There is no way to have Excel show full menus while Word shows the abbreviated menus.
Summary: While learning Excel, use the Tools – Customize feature to show the complete list of commands on each menu.

Nói thêm: Nếu bạn đang có ý định học Excel, sẽ giúp ích cho bạn nhiều nếu chọn Show Standard and Formatting Toolbars on Two Rows. Chọn kựa này cho phép bạn thấy tất cả những nút biểu tượng trên 2 thanh công cụ Standard and Formatting. Ở Excel 2000, thiết lập này hiện ra là Standard and Formatting Toolbars Share One Row. Ở phiên bản đó bạn phải click bỏ chọn ô đó.

Hệ quả: Thay đổi thiết lập của Excelsẽ có tác dụng với cả Word và các tiện ích Office khác. Chả có cách nào buộc Excel hiện Menu đầy đủ nếu bạn lại muốn Word chỉ hiện Menu rút gọn.

Tóm tắt: Khi học Excel, hãy vào Menu Tools – Customize để thấy đầy đủ các dòng lệnh của Menu.
 

SHOW FULL TOOLBARS ALL THE TIME
HIỂN THỊ THANH CÔNG CỤ LUÔN LUÔN ĐẦY ĐỦ

Problem: You are trying to learn Excel. By default, Microsoft only shows you the most common menu choices from Excel’s two most impor­tant toolbars: Standard and Formatting.
The Standard toolbar has icons for a New Workbook, Saving, Printing, Print Preview, Spell Check, Cut, Copy, Paste, Undo, and Redo. These are all fairly important items.
The Formatting toolbar has icons for Font, Font Size, Bold, Italic, Un­derline, Left Align, Center, Right Align, Number, Bullets, Indent, Out­dent, Borders, Cell Color, and Font Color. These are also all fairly im­portant items.
The complete Standard toolbar can be seen here in Fig. 7. Note that my toolbar has some extra icons from various add-ins that I use.
Vấn đề: bạn đang thử học Excel. Bằng mặc định, Anh Bill chỉ hiện cho chúng ta thấy những nút biểu tượng thông dụng trên 2 thanh công cụ quan trọng nhất; Standard và Formatting.
Thanh công cụ Standard có những biểu tượng tạo file mới, lưu, xem mẫu in, kiểm lỗi chính tả, Cắt, copy, dán, ndo và Redo. Đây là những công cụ quan trọng.
Thanh công cụ Formatting có những biểu tượng cho Font chữ, cỡ chữ, chữ đậm, chữ nghiêng, gạch dưới, canh lề trái, giữa, phải, đánh số, gạch đầu dòng, Thụt vào đầu dòng, Đóng khung, tô màu cell, màu chữ. Đây cũng là những định dạng cơ bản nhất.
Thanh công cụ Standard đầy đủ sẽ như hình 7, Chú ý rằng thanh công cụ của tôi có những nút cộng thêm tô ilấy từ mhững Add-ins tôi cài đặt.

Fig1-07.gif


Fig. 7

Although this is the complete toolbar, most default installations will only show a subset of the icons on the toolbar. An example of the abbre­viated toolbar follows in Fig. 8.
Dù rằng đây là thanh công cụ đầy đủ, phần lớn những cài đặt mặc định sẽ chỉ cho thấy 1 số biểu tượng thôi. Thí dụ 1 thanh công cụ ngắn gọn như hình 8

Fig1-08.gif


Fig. 8
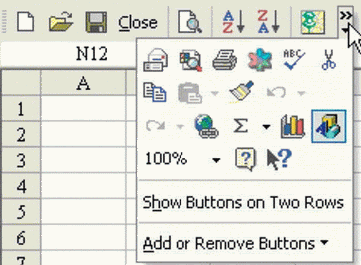
In order to use any of the other icons on the Standard toolbar, you have to choose the double-right arrow on the toolbar, as shown in Fig. 9.
Để có được mọi biểu tượng hiện trên thanh công cụ, bạn phải click vào cái mũi tên đôi trên thanh công cụ, như hình 9.

Fig1-09.gif


Fig. 9

The complete Formatting toolbar follows in Fig. 10.
Thanh công cụ Formatting đầy đủ phải như hình 10:

Fig1-10.gif


Fig. 10
Most users with a default installation will only see a portion of these icons and will have to use the double-right arrow on the toolbar to see all of the icons.
Microsoft does this in order to show you more rows of data in the spread­sheet. This may have been a problem in the days of VGA monitors. How­ever, with today’s high screen resolutions, you can afford to have the toolbars displayed on two rows and to see all of the available options at a glance.
Strategy: Display the toolbars on two rows. From the Tools menu, se­lect Customize. On the Options tab, select the option for Show Standard and Formatting toolbars on two rows, as shown in Fig. 11.
Phần lớn người dùng để trạng thái mặc định khi cài đặt Office và chỉ thấy 1 phần thanh công cụ. Anh Bill làm như thế để có thể hiện ra nhiều dòng dữ liệu trên màn hình hơn. Điều này thường thấy vào thời người ta còn xài màn hình VGA. Tuy nhiên với độ phân giải màn hình cao như hiện nay, bạ có thể xài sang cho các thanh công cụ hiện lên 2 dòng để thấy hết những nút công cụ trong 1 cái liếc sơ qua.

Fig1-11.gif


Fig. 11

Gotcha: In Excel 2000 and earlier, this option was called Display Stan­dard and Formatting Toolbars on One Row.
Summary: While learning Excel, use the Tools – Customize feature to show the complete version of Standard and Formatting toolbars.
Ghi chú: Ở phiên bản Excel 2000 và trước đó, lựa chọn này là Hiện 2 thanh công cụ trên 1 dòng.
Tóm tắt: Khi học Excel, Dùng tiện ích trong Menu Tools – Customize để hiện lên đầy đủ 2 thanh công cụ.


ADD A CLOSE BUTTON TO THE STANDARD TOOLBAR
GẮN NÚT LỆNH ĐÓNG FILE LÊN THANH CÔNG CỤ
Problem: Your efficiency with Excel would increase if you had a one-click option for closing workbooks.
Strategy: Customize the Standard toolbar to include a Close option near the Save option. Follow these steps.
1) From the menu, select View – Toolbars – Customize. The Customize option is the final choice in the list of toolbars. This will display the Customize dialog box.
While the Customize box is displayed, the toolbars are in a special state. You can take any toolbar button and drag it to a new location, to a new toolbar, or even drag it off the toolbar to delete it. Also, there are hundreds of new icons that you can add to your toolbars.
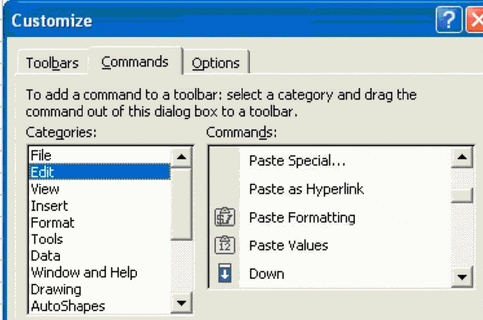
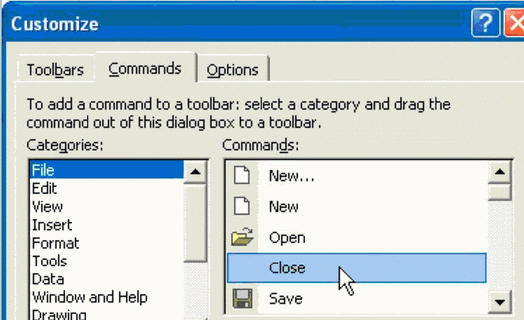
2) From the Customize dialog box, choose the Commands tab, as shown in Fig. 12.
3) Choose a Category in the left listbox. From the right listbox, you can scroll through dozens of buttons in that category.
Vấn đề: Hiệu suất sử dụng Excel của bạn sẽ tăng lên đáng kể nếu bạ có thêm 1 nút đóng file lên thanh công cụ.
Biện pháp giải quyết: Tự gắn nút bạn muốn lên thanh công cụ. Làm theo các bước sau:
1. Chọn Menu View – Tool bars – Customize, Customize là dòng dưới cùng của danh sách ca`1c toolbars. Nấn vào nó sẽ hiện hộp thoại Customize.
Khi hộp thoại này đang mở, các thanh công cụ ở trong 1 tình trạng đặc biệt: Bạn có thể dùng chuột kéo bất cứ nút lệnh nào tới bất cứ đâu bạn muốn: tới vị trí khác, vào thanh công cụ khác, vào 1 thanh công cụ mới, hoặc kép ra ngoài chỗ trống để xoá nó. Đồng thời có sẵn hàng trăm nút nhấn mà bạn có thể muốn gắn lên thanh công cụ.
2. Trên hộp thoại này, chọn tab Command, như hình 12

Fig1-12.gif


Fig. 12

4) The Close button is located in the File category. Choose File from the left listbox, as shown in Fig. 13.
4. Nút đóng file nằm trong nhóm lệnh của menu FIle. Chọn FIle bên danh sách bên trái như hình 13

Fig1-13.gif


Fig. 13

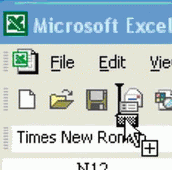
5) Click on Close in the right listbox. Drag the item towards a toolbar. When you are on the toolbar, choose the desired location. Excel will display an I-Beam at the location where the button will be added, as shown in Fig. 14.
5. Click chọn nút Close, kéo nó và di chuyển đến thanh công cụ. Khi tới thanh công cụ, chọn 1 vị trí thích hợp. Excel sẽ hiện 1 dấu hình chữ I tại vị trí nút nhấn sắp đươc thả vào, như hình 14

Fig1-14.gif


Fig. 14

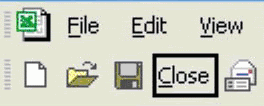
6) When the I-Beam is in the proper location, release the mouse button. The button is added to the toolbar, as shown in Fig. 15.
6. Khi dấu I nằm vào vị trí, nhả chuột. Nút nhấn công cụ sẽ được gắn vào như hình 15.

Fig1-15.gif


Fig. 15

7) Choose OK to close the Customize dialog. The Close button will re­main on your Standard toolbar in this and all future Excel sessions until you remove it.
7. Nhấn OK để thoát khỏi hộp thoại Customize. Nút Close sẽ yên vị tại thanh công cụ bất cứ khi nào bạn mở Excel lên, cho đến khi bạn xoá nó đi.

Summary: Experiment with adding new buttons so that any task that you perform regularly has a one-click option.
Tóm tắt: Thực hành việc gắn thêm các nút nhấn sao cho mọi tác vụ bạn thực hiện thường xuyên có 1 nút nhấn chỉ 1 lần click.
 
CLOSE ALL OPEN WORKBOOKS
ĐÓNG MỌI WORKBOOKS ĐANG MỞ

Problem: You have 22 Excel work­books open. You want to keep Excel open but close all of the workbooks. Doing File – Close 22 times can get monotonous.
Vấn đề: Bạn có 22 file Excel đang mở, bạn muốn Excel còn hoạt động nhưng đóng hết 22 workbooks. Dùng Menu File – Close 22 lần thì quá đơn điệu.

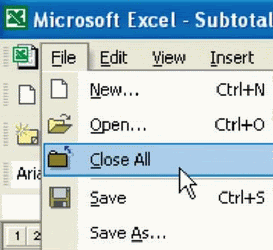
Strategy: Hold down the Shift key on the keyboard before selecting the File menu. This will allow you to see an alternate File menu with Close All in place of Close, as shown in Fig. 16.
Giải pháp: Nhấn giữ phím Shift trước khi mở Menu File. Lúc này Menu File chuyển sang dạng thay thế với Close All thế chỗ cho Close (Save All thế chỗ cho Save – ptm0412) như hình 16

Fig02-16.gif


Fig. 16

Summary: Hold down the Shift key to access the timesaving Close All command.
Tóm tắt: Nhấn giữ phím Shift trước khi mở Menu File đề tiết kiệm thời gian với Close All

DOUBLE THE VALUE OF THE RECENTLY USED FILE LIST
TĂNG GẤP ĐÔI SỐ FILE TRONG DANH SÁCH FILE VỪA MỞ TRƯỚC ĐÂY.

Problem: You routinely open the same six workbooks. The File menu shows only the last four workbooks that you opened or saved. It sure would be nice if it showed at least the last six workbooks.
Vấn đề: Bạn thường xuyên mở 1 lúc 6 files Excel để làm việc. Menu File chỉ xho thấy 4 file cuối cùng bạn đã mở hay đã lưu trước đó. Sẽ tuyệt biết bao nếu nó cho thấy it nhất 6 file cuối.

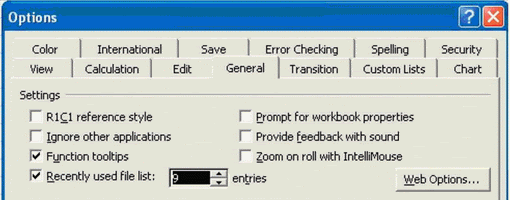
Strategy: Good news! You can increase the Recently Used File List (located at the bottom of the File menu) from four to nine workbooks. Go to Tools – Options – General. Use the spin button to dial the Recently Used File List from 4 to 9, as shown in Fig. 17.
Giải pháp: Có tin tốt đây! Bạn có thể tăng danh sách các file vừa mở (ở cuối Menu File) từ 4 lên 9. Vào Menu Tools – Options – General. Dùng cái nút nhấn tăng để thay đổi số File từ 4 thành 9 như hình 17

Fig02-17.gif


Fig. 17

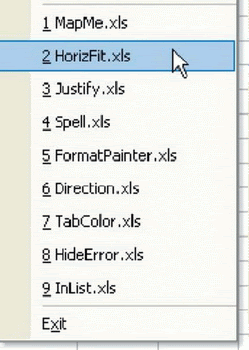
Gotcha: Immediately after changing the value, your list may only show four files. You have to open and close additional files to expand the list, as shown in Fig. 18.
Kết quả: Ngay khi mới điều chỉnh như trên, danh sách củ bạn cũng chỉ có 4 tên file. Bạn phải mở thêm, và đóng lại các file cần dùng để kéo dài cái danh sách ra.

Fig02-18.gif

Fig. 18

Summary: To have the File menu show more than the last four workbooks used, use Tools – Options – General and select the number of recently used files for it to show.
Tóm tắt: Để buộc mrnu File thể hiện danh sách các file đã dùng trước đó với số luợng nhiếu hơn, sử dụng Menu Tools – Options – General và chọn số lượng file trong danh sách


REMEMBER WORKBOOKS TO OPEN USING A WORKSPACE
GHI NHỚ CÁC WORKBOOKS ĐỂ MỞ HÀNG LOẠT BẰNG CÁCH SỬ DỤNG WORKSPACE (KHÔNG GIAN LÀM VIỆC)


Problem: You need to open seven files in order to prepare a weekly re­port. It is tedious to open all seven workbooks.
Vấn đề: Bạn cần mở 7 file Excel để làm ra 1 báo cáo hàng tuần. Thật nhạt nhẽo khi phải mở lần lượt 7 file.

Strategy: Open the seven workbook files and save them as a workspace. Follow these steps.
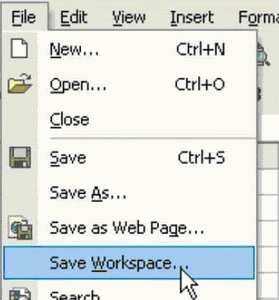
1) Open the workbooks and then select File – Save Workspace, as shown in Fig. 19.
1. Mở lần đầu 7 file sau đó chọn Menu – File – Save Workspace như hình 19.


Fig02-19.gif


Fig. 19


2) Give the workspace file a name, such as MyFiles. As shown in Fig. 20, note that the file saved will have an .xlw extension instead of.xls
2. Chọn cho Workspace 1 cái tên thí dụ MyFiles. Như hình 20, chú ý file được lưu có phần mở rộng .xlw thay vì .xls


Fig02-20.gif


Fig. 20

3) You can now close Excel and open MyFiles.xlw. All seven workbooks will open at once.
3. Giờ thì bạn có thể đóng toàn bộ file, và mở MyFiles.xlw. Cả 7 file sẽ được mở 1 loạt.


Gotcha: This workspace does not actually store the seven files, but only points to them. If you were to move one of the seven files to a new folder using Windows Explorer, Excel would not be able to open that file.
Gotcha: Excel does not remember the arrangement of the workbooks in the workspace. Although your original workbooks may have been maximized, Excel might open them in a tiled arrangement. Choose the Maximize icon at the top of one workbook to return all workbooks to their original maximized state. This problem was worse in Excel 97, where Excel would frequently forget the zoom and frozen panes in the workspace
Kết quả: Vùng làm việc này không lưu trữ 7 file Excel, nhưng chỉ đường dẫn đến 7 file đó. Nếu bạn dời 7 file này đến địa chỉ mới, Excel sẽ không thể dùng MyFiles để mở llại 7 files nói trên.
Excel không ghi nhớ sự sắp xếp các work books trong vùng làm việc. Dù rằng các work books của bạn khi đóng đang ở trạng thái cực đại toàn màn hình, Excel sẽ mở chúng và sắp xếp theo dạng tile. Hãy nhấn nút Maximize của 1 trong các workbook để khôi phục trạng thái cực đại của các bảng tính. Vấn đề này là 1 cái dở của Excel 97, khi Excel thường quên các trạng thái của vùng làm việc.

Summary: To reduce the time in opening more than one workbook, use File – Save Workspace when opening workbooks, and then name the workspace.
Tóm tắt: Để giảm thời gian khi phải mở nhiều file 1 lúc, dùng Menu File – Save Workspace khi đã mở xong, và đặt tên cho vùng làm việc mới này.
 
AUTOMATICALLY MOVE THE CELL POINTER IN A DIRECTION AFTER ENTERING A NUMBER
TỰ ĐỘNG DICH CHUYỂN Ô CHỌN THEO MỘT HƯỚNG SAU KHI NHẬP DỮ LIỆU SỐ

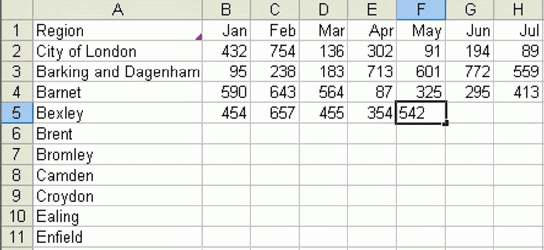
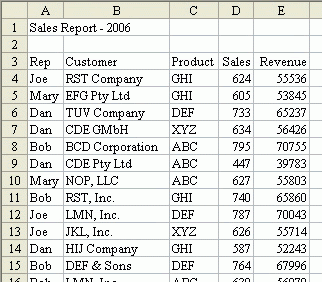
Problem: If you type a number and then press a direction arrow key, Excel will enter the number and move the cell pointer in the direction of the arrow key. However, if you are using the numeric keypad, it is much more convenient to use the Enter key on the numeric keypad rather than the arrow keys. By default, Excel will move the cell pointer down one cell when you type Enter. When entering data in a worksheet such as the one shown in Fig. 21, is there a way to have Excel automatically move the cell pointer to the next cell to the right after each entry?
Vấn đề: Nếu bạn gõ 1 dữ liệu số rồi nhấn phím mũi tên, Excel sẽ chấp nhận con số đó và dời điểm chọn theo hướng của mũi tên. Ngoài ra nếu bạn dùng các phím số bên numpad, sẽ tiện lợi hơn nếu bạn dùng phím Enter bên numpad thay cho các phím mũi tên. Bằng mặc định, Excel sẽ dời điểm chọn xuống dưới ô hiện hành 1 ô khi nhấn Enter. Khi nhập dữ liệu vào 1 bảng như hình 21, có cách nào cho Excel tự động chuyển điểm chọn sang ô kế bên phải sau khi nhấn Enter?

Fig03-21.gif


Fig. 21

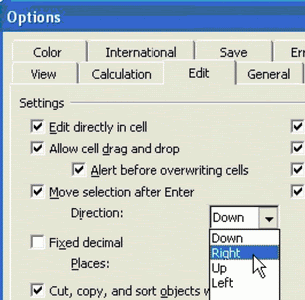
Strategy: Go to Tools – Options. On the Edit tab, go to the Move Selec­tion after Enter Directiondropdown. Choose Right, as shown in Fig.22.
Giải pháp: Vào Menu Tool – Option. Trong tab Edit, tới mục Move Selec­tion after Enter và chọn Right trong danh sách xổ xuống. như hình 22

Fig03-22.gif


Fig. 22

Result: The cursor will automatically move one cell to the right every time you press the Enter key
Kết quả: Con trỏ sẽ tự động nhảy sang ô liền kề bên phải mỗi khi bạn nhấn Enter.

Summary: You can have the cell pointer move in any direction after us­ing Enter by changing this setting on the Edit tab of the Options menu.
Tóm tắt: Bạn có thể buộc diểm chọn ô dịch chuyển theo hướng bạn muốn mỗi khi nhấn Enter bằng cách đổi thiết lập trong Menu Tool – Option, tab Edit
 
HOW TO SEE HEADINGS AS YOU SCROLL AROUND A REPORT
LÀM THẾ NÀO ĐỂ BẠN VẪN THẤY CÁC DÒNG TIÊU ĐỀ KHI KÉO TRƯỢT CÁC THANH CUỘN

Problem: You have a spreadsheet with headings at the top, as shown in Fig. 23. You want to be able to scroll through the data and always see the headings
Vấn đề: Bạn có 1 bảng tính với một vài dòng tiêu đề trên cùng như hình 23, bạn muốn luôn nhình thấy các tiêu đề này khi kéo thanh trượt qua hết bảng tính.


Fig03-23.gif


Fig. 23

Strategy: Use the Freeze Panes command on the Window menu. It is not obvious, but in order to make the Freeze Panes command work, you must place the cell pointer in the correct location before using the com­mand. Look at the spreadsheet shown in Fig. 23. It would be really handy to have rows 1 through 3 always visible while you scroll. Here’s how to do that.

Giải pháp: Sử dụng lệnh Freeze Panes trong menu Window. Nó không rõ đành rành, nhưng bạn phải đặt con trỏ ô vào đúng vị trí nếu muốn sử dụng được lệnh này chính xác. Xem bảng tính ở hình 23, hiển nhiên là với bảng tính như vậy bạn sẽ muốn lúc nào cũng trông thấy các dòng từ 1 đến 3 khi kéo thanh trượt. Sau đây là cách thực hiện:

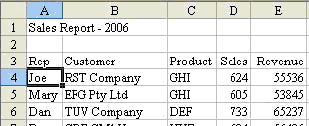
1) Place the cell pointer in cell A4, as shown in Fig. 24, before you select the Freeze Panes command. The Freeze Panes command will freeze all visible rows above the cell pointer and all visible columns to the left of the cell pointer. By placing the cell pointer in column A, you will not freeze any columns, only the rows.
Đặt ô chọn là A4, như hình 24, trước khi dùng lệnh Freeze Panes. Lệnh này sẽ đóng cứng mọi dòng ở trên ô chọn và mọi cột bên tay trái của ô chọn. Bằng cách đạăt ô chọn vào 1 ô trong cột A, bạn sẽ chỉ cố định các dòng, không cố định cột.


Fig03-24.gif


Fig. 24

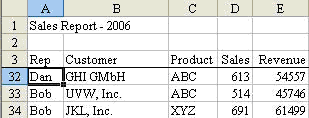
2) With the cell pointer in cell A4, select Window – Freeze Panes. A sol­id horizontal line will be drawn between rows 3 and 4. As you scroll down past row 30, you will always be able to see the heading rows, as shown in Fig. 25.
Với ô hiện hành là A4, mở menu Window, chọn Freeze Panes. Một đường kẻ liền nét sẽ được tạo giữa 2 dòng 3 và 4. khi bạn kéo thanh trượt đến dòng 30, bạn vẫn thấy 3 dòng tiêu đề như hình 25


Fig03-25.gif


Fig. 25

Additional Details: To turn off this feature, go to the Window menu and select Unfreeze Panes. This menu item is only visible after you have frozen the panes.
If you want to maximize the number of rows visible, it is possible to freeze only row 3.

Ghi chú: Để gỡ bỏ lệnh này, vào lại menu Window, chọn Unfreeze Panes. Mục này chỉ hiện ra khi bạn đã cố định hàng hay cột.
Để nhìn được tối đa các dòng dữ liệu, tốt hơn hết bạn chỉ cố định dòng 3:


1) First, unfreeze the panes using Window – Unfreeze Panes. Place the cell pointer in the last visible row in the window. Hit the Down Ar­row twice to force rows 1 and 2 to scroll above the window. Row 3 is now the first visible row, as shown in Fig. 26.
Trước tiên, gỡ bỏ sự cố định dòng bạn mới làm. Đặt điểm chọn ô vào dòng nhìn thấy dưới cùng của cửa sỏ. Nhấn phím mũi tên xuống 2 lần để 2 dòng 1 và 2 bị cuốn lên trên và bị che khuất. Dòng 3 trở thành dòng nhìn thấy trên cùng như hình 26.

Fig03-26.gif


Fig. 26

2) Place the cell pointer in cell A4 and invoke the Window – Freeze Panes command. You will now be able to scroll with only row 3 frozen at the top of the window, as shown in Fig. 27.
Đặt lại ô chọn là A4 và gọi lại lệnh Window – Freeze Panes. Bạn sẽ chỉ cố định dòng 3 trên đầu cùng của bảng tính như hình 27.

Fig03-27.gif


Fig. 27

Summary: Use the Window – Freeze Panes command to keep certain rows visible at the top of the window as you scroll through the data.
Tóm tắt: Dùng lệnh Window Freeze Panes để giữ vài dòng tiêu đề cố định và được luôn luôn nhình thấy khi kéo thanh cuộn đến khắp các vùng dữ liệu
 
Learn Excel with Mr. Excel - Part 1 (Continue)

HOW TO SEE HEADINGS AND ROW LABELS AS YOU SCROLL AROUND A REPORT
LUÔN LUÔN THẤY CẢ TIÊU ĐỀ DÒNG VÀ TIÊU ĐỀ CỘT
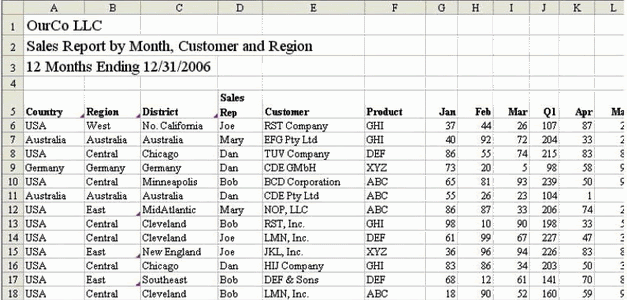
Problem: As shown in Fig. 28, you have a wide spreadsheet. There are headings at the top of the spreadsheet and there are several columns of labels at the left side of the spreadsheet. You also have monthly sales figures that extend far to the right. You need to be able to scroll through the sales figures while always seeing both the headings at the top and the labels at the left of the spreadsheet.
Vấn đề: Như hình 28, bạn có 1 bảng tính khá lớn theo chiều rộng. Có các dòng tiêu đề ở trên và vài cột có tiêu đề bên trái.

Fig03-28.gif


Fig. 28

Strategy: Use the Freeze Panes command on the Window menu. Re­member, to make the Freeze Panes command work, you must place the cell pointer in the correct location before using the command.
In the spreadsheet shown in Fig. 28, you might want row 5 and columns A through F visible at all times. You would then be able to scroll through the monthly figures, while always being able to see the customer infor­mation in the left columns and the month name information in row 5.
Giải pháp: Sử dụng Freeze Panes. Nhớ rằng để cho Freeze panes hoạt động đúng, phải chọn ô chọn ở đúng vị trí trước khi dùng.
Ở bảng tính hình 28, bạn sẽ muốn dòng 5 và các cột từ A đến F được nhình thấy vào mọi lúc. Bạn có thể kéo thanh trượt dọc theo dữ liệu các tháng, trong khi vẫn thấy thông tin 5 cột đầu và thêu đề tháng ở dòng 5.

1) First, you want to scroll the worksheet so that cell A5 is in the upper left visible corner. You could try to do this with the scrollbars or the arrows, but this method will always work:
Scroll A5 out of view by hitting PgDn a few times and the Tab key a few times.
Hit the F5 key to bring up the Go To dialog.
Enter A5 in the Reference box and hit Enter. Cell A5 will now be the first visible cell in the window.
Trước tiên bạn muốn cell A5 nằm ở góc trên bên trái. Bạn có thể dùng thanh trượt hoặc phím mũi tên, nhưng các sau đây sẽ có tác dụng tốt:
- Di chuyể cell A5 ra khỏi màn hình bằng cách nhấn tab vài lần và PgDn vài lần.
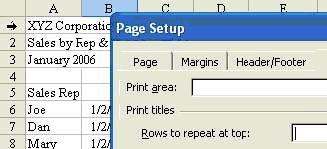
- Nhấn F5 để mở hộp thoại GoTo
- Gõ A5 vào ô Reference, nhấn Enter. Cell A5 sẽ nằm ngay góc trên bên trái.

2) Place the cell pointer in cell G6. Select Window – Freeze Panes. You will see a solid line between columns F and G and between rows 5 and 6.
Cho ô chọn là G6, Chọn Window – Freeze Panes. Bạn sẽ thấy 1 đường kẻ đậm ở giữa dòng 5 và dòng 6, và 1 đường nữa giữa 2 cột F và G.

Result: As shown in Fig. 29, you can scroll through any numeric data while being able to look at the row and column headings.
Kết quả: Như hình 29

Fig03-29.gif


Fig. 29

Gotcha: In Fig. 29, rows 1 through 4 cannot be accessed. You will have to unfreeze the panes to change those rows.
If you have many columns frozen at the left of the report and then make those columns wider, it is possible that the entire window will be filled with the frozen columns. You then have a situation where the arrow keys will move the cell pointer to other cells that you cannot see. The Address Bar and the Formula Bar will show you the active cell, but you cannot see it. You need to either make the frozen columns less wide, or use the Window – Unfreeze Panes command to unfreeze the panes.
Ghi chú: Ở hình 29, các dòng từ 1 đến 4 không thể thấy và không thể tác động vào. Bạn sẽ phải unFreeze Panes để cò thể chỉnh sửa chúng.

Summary: Use the Window – Freeze Panes command to keep certain rows and columns visible at the top of the window as you scroll through the data. It is critical that you place the cell pointer in the first cell that is not to be frozen before invoking the command.
Tóm tắt: Dùng Freeze panes để giữ cố định cả dòng và cột được nhìn thấy khi kéo các thanh trượt. Phải ghi nhớ đặt con trỏ ô ở cell đầu tiên không bị cố định trước khi thực hiện lệnh.
 
HOW TO PRINT TITLES AT THE TOP OF EACH PAGE
IN CÁC DÒNG TIÊU ĐỀ TRÊN ĐẦU MỖI TRANG
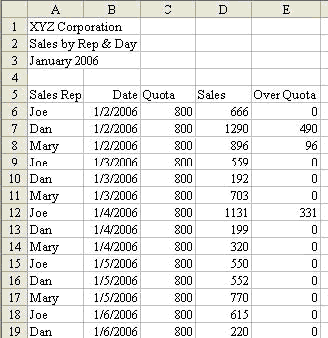
Problem: The report shown in Fig. 30 has 90 rows of data. You want to have the title rows print at the top of each printed page.
Vấn đề: Cái báo cáo trong hình 30 có 90 dòng dữ liệu. Bạn muốn các dòng tiêu đề phải được in trên đầu mỗi trang.

Fig03-30.gif


Fig. 30

Strategy: Printing options are controlled on the fourth tab of the Page Setup dialog box. In this case, you want rows 1 through 5 to print at the top of each page.
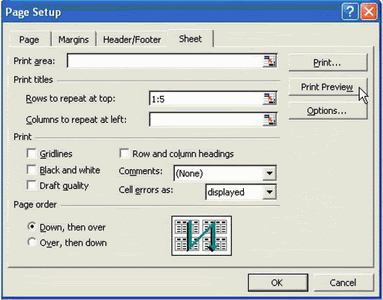
1) Select Page Setup from the File menu. The dialog box offers four tabs. Select the fourth tab, called Sheet. See Fig. 31.
2) Enter 1:5 in the box called Rows to Repeat at Top, as shown in Fig. 31, in order to have rows 1 through 5 repeated at the top of each printed page. Select Print Preview to ensure that the results are what you desire.
Giải pháp: Các chọn lựa cho trang in nằm ở tab thứ tư của hộp thoại Page Setup. Trong trường hợp này, bạn muốn các dòng từ 1 đến 5 là tiêu đề trang in.
1. Mở menu File – Page Setup. Chọn tab thứ 4 như hình 31
2. Gõ 1:5 trong ô Rows to Repeat at top, nhằm chọm 5 dòng từ 1 đến 5 làm tiêu đề trang in. Chọn Print Preview để bảo đảm rằng kết quả đã đạt được.

Fig03-31.gif


Fig. 31
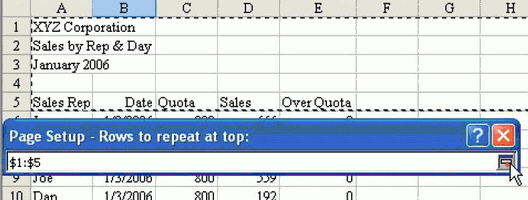
Alternate Solution: Rather than typing 1:5 in the text box, you could click the reference icon on the right side of the box, as shown in Fig. 32.
Biện pháp thứ 2: Thay vì gõ vào ô Rows to Repeat at top, bạn có thể dùng chuột click vào biểu tượng bên phải của ô đó như hình 32

Fig03-32.gif

.
Fig. 32
This will shrink the Page Setup dialog box to just the Rows to Repeat at Top dialog. You can now use the mouse to select rows 1 through 5. Choose the icon at the right side of the text box to return to the Page Setup dialog box, as shown in Fig. 33.
Làm như vậy sẽ thu nhỏ hộp thoại chỉ còn cái textbox Rows to Repeat at top. Bây giờ bạn có thể dùng chuột chọn 5 dòng từ 1 đến 5. Nhấn cái biểu tượng lúc nãy 1 lần nữa để bung rộng trở lại hộp thoại Print Setup, như hình 33

Fig03-33.gif


Fig. 33
Alternate Solution: If the rows you desire to repeat at the top are vis­ible behind the dialog box, as shown in Fig. 34, use the mouse to high­light them while the cursor is in the Rows to repeat at top textbox.
Biện pháp thứ 3: Nếu các dòng bạn muốn làm tiêu đề trang có thể thấy được như hình 34, dùng chuột chọn các dòng khi con trỏ nhấp nháy đang nằm trong textbox nói trên.

Fig03-34.gif


Fig. 34

Summary: Use the Page Setup command on the File menu to have titles and headings appear at the top of every page.
Tóm tắt: Dùng Page Setup để định dạng trang in có các dòng tiêu đề ở mỗi trang.

Cross Reference: Another way to have text appear at the top or bottom of every page is to use the Header/Footer command on the Page Setup dialog. See How to Print Page Numbers at the Bottom of Each Page on Page 19.
Bài có liên quan: 1 cách khác để có các dòng chữ xuất hiện trên đầu trang và dưới cuối mỗi trang, là dùng lệnh Header/Footer trong hộp thoại Page Setup. Coi 1 bài khác về đánh số trang in ở cuối mỗi trang.
 
PRINT A LETTER AT THE TOP OF PAGE 1 AND REPEAT HEADINGS AT THE TOP OF EACH SUBSEQUENT PAGE
IN 1 ĐOẠN THƯ Ở TRANG 1 VÀ LẬP LẠI TIÊU ĐỀ CHO CÁC TRANG SAU.

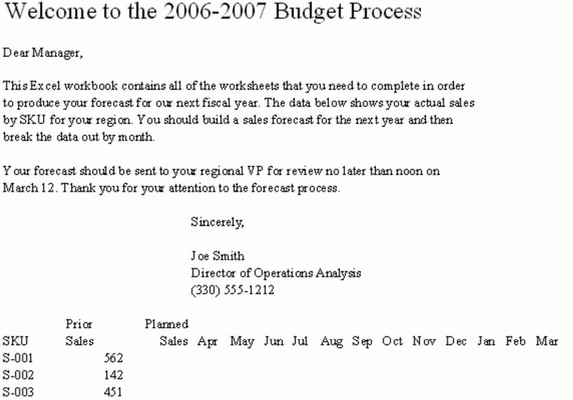
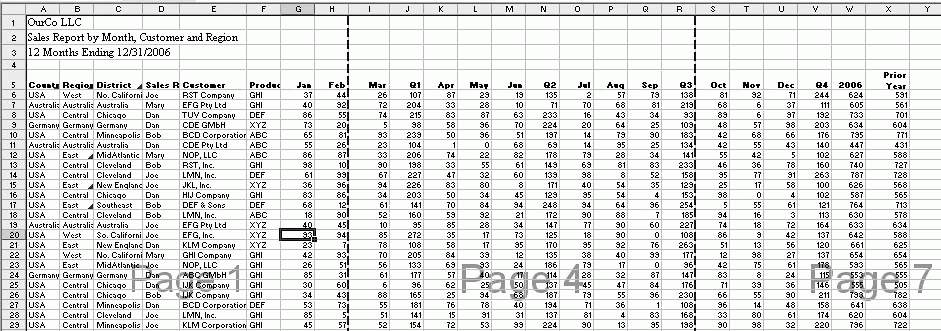
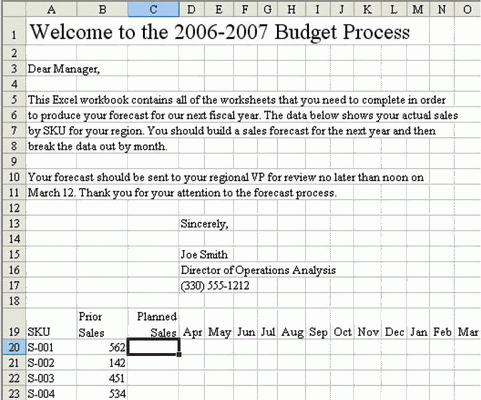
Problem: As shown in Fig. 35, you are sending out a worksheet that contains instructions, followed by a lengthy report. You would like the headings to appear at the top of each page after the first page. You don’t want the headings to appear at the top of the letter on page one.
Vấn đề: Như hình 35, bạn đang muốn gởi đi 1 bảng tính có những câu hướng dẫn mở đầu, và 1 báo cáo minh hoạ kèm theo. Bạn muốn cái tiêu đề xuất hiện đầu mỗi trang từ trang 2 trở về sau. Bạn không muốn phần mở đầu (đoạn hướng dẫn, giới thiệu)

Fig03-35.gif


Fig. 35

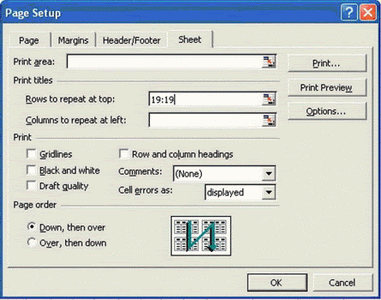
Strategy: Printing options are controlled on the fourth tab of the Page Setup dialog box. If you specify that a row in the middle of the print range should be repeated at the top of the pages, it will not begin repeat­ing until the next page.
1) Select Page Setup from the File menu. The dialog box offers four tabs. Select the fourth tab, called Sheet. See Fig. 36.
2) Enter 19:19 in the box called Rows to Repeat at Top, as shown in Fig. 36, to have row 19 print at the top of each page after page 1.
Quy trình: Các chọn lựa cho trang in nằm ở tab thứ tư của hộp thoại Page Setup. Nếu bạn chọn 1 dòng ở khúc giữa trang làm tiêu đề trang, dòng đó sẽ không bị lập lại cho đến khi chuyển sang trang 2,
1. Mở menu File – Page Setup. Chọn tab thứ 4 (tab có tên Sheet) như hình 36
2. Gõ 19:19 trong ô Rows to Repeat at top như hình 36.

Fig03-36.gif


Fig. 36

Result: The headings do not print at the top of page 1, but at the top of pages 2 and beyond. Fig. 37 shows the first page in Print Preview mode.
Kết quả: Dòng 19 sẽ không in trên đầu trang 1 mà chỉ xuất hiện ở trang in thứ 2 trở về sau. Hình 37 cho thấy print preview của trang 1

Fig03-37.gif


Fig. 37

Fig. 38 shows the second page in Print Preview mode:
Hình 38 cho thấy Print preview của trang 2

Fig03-38.gif


Fig. 38

Summary: The Rows to Repeat at Top figure does not have to be at the top of the print range. If your selection is in the middle of the print range, the headings will only print on subsequent pages.
Tóm tắt: Mục Rows to repeat at top không ảnnh hưởng đến đầu trang của mọi trang. Nếu bạn chọn tiêu đề trang là 1 dòng giữa trang, nó chỉ thi hành (xuất hiện) ở những trang sau.
 
HOW TO PRINT PAGE NUMBERS AT THE BOTTOM OF EACH PAGE
IN SỐ TRANG Ở CUỐI MỖI TRANG
Problem: You are printing a lengthy report. You want the pages to be numbered.
Vấn đề: Bạn đang in 1 báo cáo dài, và muốn đánh số trang.
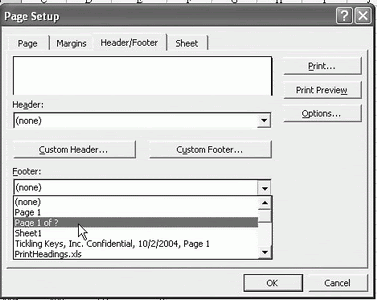
Strategy: The header and footer options are controlled on the third tab of the Page Setup dialog box. There are a variety of formats thatcan be specified on this tab.
Select Page Setup from the File menu. The dialog box offers four tabs. Select the third tab called “Header/Footer.” There are a number of stan­dard options in the footer dropdown. One of these options is called Page 1 of ?. This option will print a footer like “Page 1 of 2” in the bot­tom center of each page.
Biện pháp: Các chọn lựa về đầu trang và cuối trang được kiểm soát ở tab thứ 3 của hộp thoại Page Setup. Có một số các địng dạng có thể xác định trong tab này.
Chọn Menu File Page Setup. Chọn tab thứ 3. Có 1 số lựa chọn tiêu chuẩn trong phần xổ xuống của Page Footer. Một trong số đó là Page 1 to ?. Chọn lựa này cho phép in số trang kiểu Page 1 of 2 ở giữa cuối mỗi trang. Xem hình 39.

Fig04-01.gif


Fig 39
Alternate Solution: It is possible to design a custom footer by select­ing the Custom Footer… button. In a custom footer, you can build a footer for the left, center, and right sides of the page.
Select the Custom Footer… button
Tab to the right section: text box
Type the word Page followed by a space.
Click the Page # icon (Figure 40).
Type a space followed by the word of followed by a space.
Click the Total Pages icon (Figure 41).
Biện pháp thứ 2: Có thể tự tạo dạng cho phần cuối trang nếu chọn nút nhấn Custom Footer. Ở mục này, bạn có thể canh trái, phải, giữa, cho phần cuối trang.
Click nút Custom Footer
Chọn ô text bến phải
Gõ vào “Page “ (có kèm 1 khoảng trắng)
Click vào biểu tượng số thứ tự trang (hình 40)
Gõ vào chữ “ of “ (kèm 2 khoảng trắng 2 đầu chữ of)
Click biểu tượng Tổng số trang. (hình 41)
Fig04-02.gif


Fig40

Fig04-03.gif


Fig41
Result: The custom footer text appears on the right side of the page.
Kết quả: Định dạng cuố`i trang xuất hiện bên phải dưới cuối mỗi trang.

Fig04-04.gif

Fig42
Gotcha: Sometimes the footer text will crash into the data from the report. If you have adjusted the lower margin to 0.5” you should adjust the footer margin to 0.25” to prevent this condition.
Ghi chú: Đôi khi cái footer nó đè lên dữ liệu in. Nếu bạn chọn lề dưới trang là 0.5”, hãy chọn lề của footer là 0.25”

Fig04-05.gif


Fig43

Summary: You can customize the header and footer to contain a page number, total number of printed pages, the file name or any custom text that you like. There are a left, center, and right header.
Tóm tắt: Bạn có thể tự chọn lựa các đầu trang và cuối trang in vớiđánh số trang, tổng số trang, tên file, hoặc bất kỳ đoạn văn nào bạn muốn.
 
HOW TO MAKE A WIDE REPORT FIT TO ONE PAGE WIDE BY MANY PAGES TALL
ĐỊNH DẠNG BẢNG TÍNH RỘNG CHO VỪA BỀ RỘNG TRANG IN
Problem: After creating a wide report, it is printing four pages wide. You want to make it fit one page wide.
Vấn đề:Sau khi lập 1 báo cáo rộng quá khổ cỡ 4 trang, bạn muốn làm sao khi in nó vừa với 1 khổ giấy.
Strategy: Ultimately, you will set the Page Setup to print to 1 page wide by <blank> pages tall. Before you can do that, you should follow these steps.
Giải pháp: Bạn hãy thiết lậptrong Page Setup để điều chỉnh trang in rộng 1 trang và để trống số trang trong ô chiều dọc. Hãy làm theo các bước sau:

Fig04-06.gif

Fig44
1. Eliminate extra columns from the print range. This worksheet has some lookup tables beyond column X that you do not want to print. Highlight columns A through X and select File – Print Area – Set Print Area.
2. Make the columns narrower. Select the data in A6:X130. From the menu, select Format – Column – AutoFit Selection.
3. Look for headings that can be on two lines. Sales Rep in cell D5 is an example. Prior Year in X5 had been previously split to two lines. (See Cross-Reference.)
4. Change the orientation to Landscape. From File – Page Setup, go to the Page tab and select Landscape in the orientation section.
5. Adjust the margins. On the Margins tab of the File – Page Setup dialog, set the left and right margins at 0.25”. Adjust the top and bottom to 0.5” and the footer margin to 0.25”

1. Loại bỏ những cột không cần in ra khỏi vùng in. Bảng tính này có những bảng tham chiếu sau cột X và bạn không muốn in nó ra. Chọn các cột từ A đến X và chọn Menu FIle – Print Area – Set Print Area.
2. Làm cho các cột nhỏ lại đến mức tối thiểu: Chọn vùng dữ liệu A6:X130. Mở menu Format, chọn Column – Auto Fit Selection.
3. Tìm các tiêu đề trang cần hiện lên 2 dòng chữ. Thí dụ Sales Rep trong cell D5. Prior Year trong cell X5 đã tự hiện lên 2 dòng.
4. Chuyển định dạng trang thành giấy in ngang: Trong tab Margin trong hộp thoại Page Setup, chọn Landscape trong khu chọn lựa Orientation.
5. Điều chỉnh lề giấy: Cũng trong tab Margin, thiết lập lề trái và phải bằng 0,25”. Điều chỉnh lề trên và dưới 0.5” và footer 0.25”.

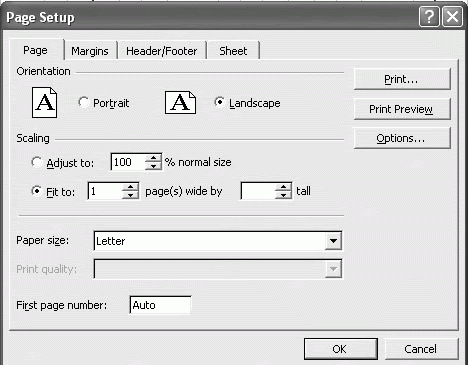
Finally, go to File – Page Setup. On the Page tab, choose the radio but&shy;ton for Fit To. Leave the first spin button as 1 page wide. Using your mouse, highlight the 1 in the spin button for pages tall. Once the 1 is highlighted, hit the delete key in order to leave this entry completely blank.

Cuối cùng, vào tab Page, chọn vào chỗ Fit To, nhấn chọn hoặc gõ 1 vào chỗ Page wide. Dùng chuột tô màu số 1 chỗ Page Tall và xoá trống ô này.

Fig04-07.gif

Fig45

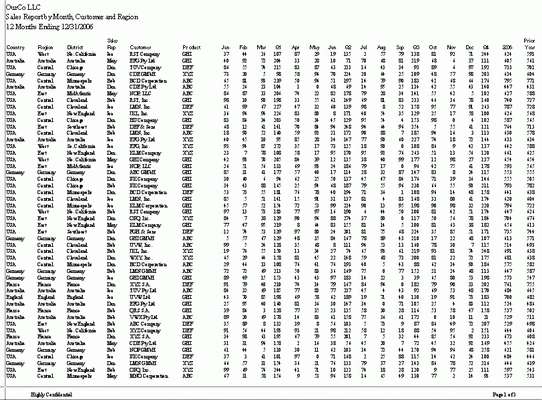
Result: The report will fit on 1 page wide and 3 pages tall.
Kết quả: Bản báo cáo của bạn sẽ vừa 1 bề rộng khổ giấy và thành 3 trang.

Fig04-08-1.gif

Fig46

Summary: The secret to having the report constrained to one page wide and any number of pages tall is to use the Page Setup dialog and leave the entry for pages tall completely blank.

Tóm tắt: Làm gọn bảng tính vào 1 bề rộng trang in bằng cách vào Menu File – Page Setup và để trống cho ô Page Tall.
 
ARRANGE WINDOWS TO SEE TWO OR MORE OPEN WORKBOOKS
SẮP XẾP CÁC CỬA SỔ ĐỂ NHÌN THẤY CÙNG LÚC 2 HOẶC NHIỀU BẢNG TÍNH.
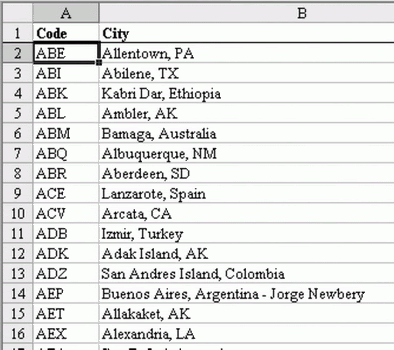
Problem: You have two workbooks open. One workbook contains a listing of airport codes and their respective city. In the other workbook, you are building a list of recommended packing items for students go&shy;ing on 7-city tours. Currently, you are shifting back and forth between the workbooks using Alt+Tab every time that you forget an airport code. It would be cool if you could see the airline codes at the same time you were working on the other workbook.
Vấn đề: Bạn mở ra 2 bảng tính, 1 bảng có 1 danh sách các mã sân bay và các thông tin thành phố liên quan. Trong 1 bảng tính khác, bạn tạo 1 danh sách các thông tin của các tour cho học sinh đến 7 thành phố. Hiện tại bạn phải chạy qua chạy lại các bảng tính bằng cách gõ Alt Tab mỗi khi bạn quên mã 1 sân bay. Sẽ tiện lợi hơn nếu bạn có thể đồng thời thấy bảng mã sân bay và bảng tính bạn đang phải làm.

Fig04-09-1.gif


Fig47

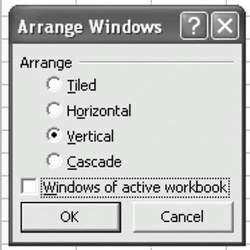
Strategy: There are four Arrange options on the Window menu. Select Window – Arrange – Vertical to see both worksheets side by side.
Giải quyết: Có 4 lựa chọn trong Menu Window. Hãy chọn dòng lệnh Window – Arrange – Vertical để thấy các bảng tính nằm cạnh nhau.

Fig04-10-1.gif

Fig48

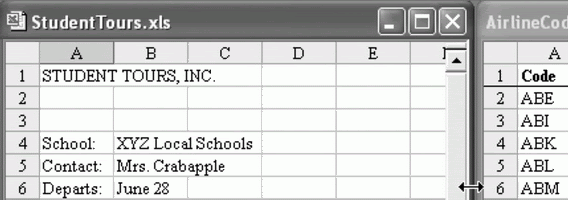
Result: You will see both windows, side by side. The window with the darker toolbar is the active window. Any data entry will occur in the activecell of that workbook.
Kết quả: Bạn sẽ thấy các bảng tính nằm cạnh nhau. Cửa sổ có thanh tiêu đề đậm hơn là cửa sổ đang hoạt động. Mọi việc nhập dữ liệu sẽ tác động vào cell hiện hành của bảng tính này.

Fig04-11.jpg

Fig 49

You can resize the window widths, although it requires two moves. First, make the right window narrower by dragging the blue edge of the window to the right.
Bạn cũng có thể điều chỉnh độ rộng của các cửa sổ bảng tính. Trước tiên, làm hẹp cửa sổ bên phải bằng cách kéo biên trái cửa sổ về bên phải.

Fig04-12.gif


Fig50

Next, drag the blue right edge of the left workbook to be wider.
Sau đó kéo biên phải cửa sổ bên trái rộng ra về bên phải.


Sau đó
Fig04-13.gif


Fig51

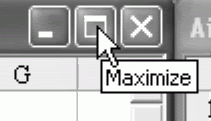
To go back to full screen mode, choose the Maximize icon at the top of each workbook.
Để trở lại chế độ toàn màn hình như cũ, chọn nút maximize ở trên đỉnh mỗi cửa sổ.

FIg04-14.gif

Fig52

Gotcha: If you have additional workbooks open, they will also appear side by side. The side-by-side display works fine for 2 or 3 workbooks, but may not work for 10 open workbooks.
Ghi chú: Nếu bạn có những bảng tính khác nữa đang mở, chúng sẽ hiện lên lần luợt kế nhau. Việc này sẽ tốt nếu bạn có 2 hoặc 3 bảng tính, nhưng sẽ rối nếu có đến 10 bảng tính.

Fig04-15.gif


Fig53

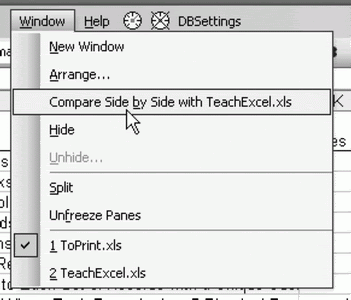
Additional Information: In Excel 2003, a new option on the Window menu allows you to Compare Side by Side. If you have only two work&shy;books open, the menu option will name the other workbook. If you have 3 or more workbooks open, you will have to select which work&shy;book in a new dialog box. If there is only one workbook open, the op&shy;tion will be grayed out.
Nói thêm: Trong Excel 2003, Menu Window có thêm 1 chức năng so sánh 2 bảng tính kế nhau. nếu bạn có tù 3 bảng tính trở lên, bạn sẽ phải chọn bảng tính nào để thực hiện trong 1 hộp thoại tiếp theo. Nếu chỉ có 1 bảng tính đang mở, dòng lệnh này sẽ mờ đi.

Fig04-16.gif


Fig54

This will arrange two windows vertically and allow the scrolling action in the first workbook to cause the second workbook to scroll in a similar manner.
Chức năng này cho phép sắp xếp 2 bảng tính nằm kề nhau, và cho phép vịêc kéo màn hình ở bảng tính này sẽ làm cho bảng tính kia cũng bị kéo theo 1 cách tương ứng.

Fig04-17.gif


Fig55

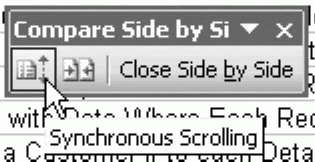
In the Compare Side by Side toolbar, turn off synchronous scrolling.
Trên thanh công cụ Compare Side by Side, nhấn tắt chức năng đồng bộ cuộn màn hình.

Fig04-18.gif


Fig56

Use the down arrow key until row 159 is at the top of the left window.
Choose the Synchronous Scrolling icon again to force the workbooks to scroll together. Now, when you move down 10 rows in either workbook, both workbooks will scroll together.
Dùng phím mũi tên di chuyển các dòng sao cho dòng 159 của bảng tính bên trái nằm trên cùng.
Nhấn mở lại chức năng đồng bộ cuộn màn hình. Bây giờ, khi bạn dịch chuyển 10 dòng trên mỗi bảng tính, cả 2 bảng sẽ bị cuộn đồng bộ với nhau.

Summary: Arranging windows in a vertical fashion allows you to view two different workbooks at the same time.
Tóm tắt: Sắp xếp các bảng tính theo chiều dọc giúp bạn có thể thấy cùng lúc 2 bảng tính.
 
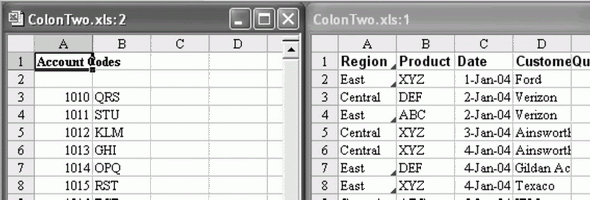
WHY IS THERE A :2 AFTER MY WORKBOOK NAME IN THE TITLE BAR?
TẠI SAO XUẤT HIỆN “:2” SAU TÊN FILE Ở TIÊU ĐỀ CỬA SỔ?
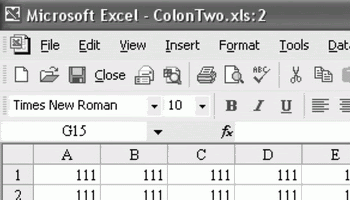
Problem: Without any explanation, a :2 appeared after the spreadsheet name in the title bar of your spreadsheet. What is this and what caused it?
Vấn đề: Không 1 lời giải thích, 1 ký hiệu “:2” xuất hiện sau tên file trên thanh tiêu đề của wundow bảng tính. Đó là cái gì và cái gì tạo ra nó?

Fig04-19.gif


Fig57

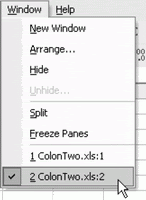
Strategy: This is an annoying thing. It gets turned on when you ac&shy;cidentally chose Window – New Window from the menu. This setting applies to the workbook and persists from one usage of Excel to the next, so it is possible that the :2 showed up months ago and has been stuck there ever since. The other symptom is that you appear to have two copies of the same workbook open in the Window command
Đây là 1 việc khó chịu. Nó xuất hiện khi bạn tình cờ chọn nhầm Menu Window – New Window. Thiết lập này áp đặt cho 1 file bảng tính và cứ thế tồn tại từ lần sử dụng Excel này đến lần khác. Dấu hiệu khác của chọn lựa này là bạn có 1 file Excel được mở 1 lúc 2 cửa sổ.

Fig04-20.gif


Fig58

To remove the :2, switch to the :2 version of the workbook. Use the black X to close that window. This will close the second window of the workbook and the :2 and :1 will be removed from the title bar.

Để gỡ bỏ dấu :2, đóng bới 1 cửa sổ của 1 trong 2 bản đang mở của file. Thao tác này sẽ đóng file đã mở lần 2 và các dấu hiệu :1, :2 sẽ biến mất.


Fig04-21.gif


Fig59

Additional Information: Is there ever a time that I would want to use this feature? Is it useful to have two versions of the workbook? Yes let’s say that you want to see both Sheet1 and Sheet2 of the workbook at the same time. Follow these steps:
From the menu, select Window – New Window. In the :2 version of the workbook, switch to Sheet2. From the menu, select Window – Arrange. In the Arrange dialog, choose Windows of Active Workbook and Verti&shy;cal. Choose OK.
Nói thêm: Có khi nào bạn muốn dùng chức năng này của Excel? Lợi ích gì khi mở 1 file lên 2 lần? Bạn sẽ thấy rằng bạn muốn thấy cùng lúc 2 sheet của cùng 1 file. Làm theo các bước sau:
Chọn me nu Window – New Window. Ở file thứ 2 mới mở có dấu hiệu :2, chuyển sang sheet 2.
Chọn Menu Window – Arrange, sau đó chọn Windows of Active Workbook và Vertical.

Result: You can see the two different sheets, side by side.
Kết quả: Bạn có thể thấy 2 sheet khác nhau nằm cạnh nhau.

FIg04-22.gif


Fig60

Summary: The :2 usually happens when you accidentally choose Window – New Window. It can be removed, and it happens that there are certain instances where this can be useful.
Tóm tắt: Dấu hiệu :2 xuất hiện khi bạn tình cờ chọn nhầm Menu Window – New Window. Nó có thể gỡ bỏ, nhưng đôi khi nó lại tỏ ra hữu dụng.
 
HAVE EXCEL ALWAYS OPEN CERTAIN WORKBOOK(S)
LÀM CHO EXCEL LUÔN MỞ 1 FILE ĐỊNH TRƯỚC.

Problem:
You always use Excel to work on a icular workbook. Every time that you open Excel, you want this workbook to open automatically.
Strategy:
Place the file (or a shortcut to the file) in the XLStart folder. This folder can generally be found in the C:\Documents and Settings\ Username\Application Data\Microsoft\Excel\ folder. Anything in this folder will automatically start when Excel starts.

Vấn đề: Bạn luôn làm việc bằng Excel trong 1 file có sẵn. Mỗi lần mở Excel, bạn muốn nó mở ngay file này 1 cách tự động.
Biện pháp: Đặt file nói trên hoặc shortcut của nó vào thư mục XlStart. Thư mục này có thể tìm thấy ở trong C:\Documents and Settings\ Username\Application Data\Microsoft\Excel\. Mọi file đặt trong thư mục này sẽ khởi động cùng Excel.

Fig-99.gif


Fig. 60

37 of 853

Alternate Strategy:
You can specify one folder to act as an additional XLStart folder. Follow these steps.
1) Move the Excel workbook or workbooks to a new folder. Excel will try to open every file in this folder, so make sure that you do not have other files in it.
2) Open Excel. From the Tools menu, select Options.
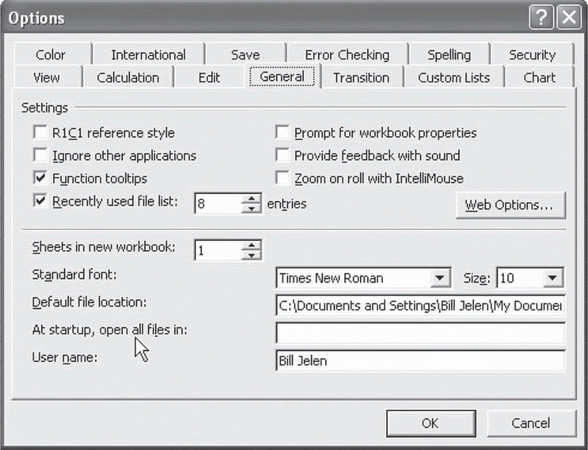
3) In the Options dialog box, find the General tab. There are five fields at the bottom of the General tab. As shown in Fig. 61, in Excel 2002 and later versions, the penultimate field is called At Startup, Open all Files in:. In Excel 2000 and earlier versions, this same field was called Alternate Startup File Location, as shown in Fig. 62. In either case, enter the path to the folder in this field.

Cách thứ 2: Bạn có thể thiết lập 1 thư mục có tính năng như thư mục XLStart. Làm theo các bước sau:
1. Dời các file Excel bạn cần mở tự động vào 1 thư mục mới. Excel sẽ mở mọi file trong thư mục này, nên chỉ dời những file cần thiết vào đây.
2. Mở Excel. Mở Menu Tools – Options.
3. Trong hộp thoại Options, mở tab General. Có 5 mục trong vùng dưới hộp thoại. Như hình 61, trong Excel 2002 trở về sau, mục bạn cần tìm là At Sartup, Open Filees in… Ở Excel 2000 trở về trước, mục này có tên là Alternate Startup Location. Trong cả 2 trường hợp, gõ địa chỉ thư mục mới tạo vào mục đó.

Fig-61.gif


Fig. 61


Fig-62.gif


Fig. 62

38 of 853

Alternate Strategy:
A third strategy is to use a command line switch. This is discussed in the next topic.
Summary:
Excel will automatically open all files in the XLStart folder or in one additional alternate startup folder that you specify.

Cách thứ 3: Dùng 1 dòng lệnh. Cách này sẽ được nói tới sau.

Tóm tắt: Excel sẽ tự mở 1 số file trong thư mục XLStart hoặc 1 thư mục do bạn chỉ định.
 
Lần chỉnh sửa cuối:
SET UP EXCEL ICONS TO OPEN A SPECIFIC FILE ON STARTUP
THIẾT LẬP CÁC BIỂU TƯỢNG CỦA FILE ĐỂ MỞ TỰ ĐỘNG.

Problem:
You routinely use the same five files in your job. You want a series of five icons on your desktop, with each opening one of the specific files.
Strategy:
Use a startup switch in the shortcut. Excel offers startup switches to open a specific file, to open a file as read-only, to suppress the startup screen, or to specify an alternate default file location. Follow
these steps.
1) Minimize all open windows with Win+M. The Win key is usually located between the left Ctrl and left Alt keys. It has a picture of a flying Window icon, as shown in Fig. 63.

Vấn đề: Bạn thường xuyên làm việc với 5 file trong công việc. Bạn muốn có 1 loạt 5 biểu tượng trên desktop, mỗi các mở 1 file.
Biện pháp: Dùng 1 dấu / trong shortcut. Excel cung cấp những chọn lựa khi mở 1 file xls: Mở dạng chỉ đọc (read only), để ngăn không xuất hiện màn hình khởi động, hoặc để chỉ định 1 thư mục để mở tự động khi khởi động. Làm theo các bước sau:
1. Hạ nhỏ mọi cửa sổ bằng phím Window+M. Phím Window là phím nàm giữa phímCtrl và phím Alt bên trái.

Fig-63.gif


Fig. 63


39 of 853

2) Open Windows Explorer with Win+E.
3) Browse to one of these locations:
• For Excel 2003: \Program Files\Microsoft Office\Office11
• For Excel 2002: \Program Files\Microsoft Office\Office10
• For Excel 2000: \Program Files\Microsoft Office\Office
4) If Windows Explorer is in full screen mode, choose the Restore Down button in the upper right corner of the Window, as shown in Fig. 64.
5) Using the mouse, grab the blue title bar of the Windows Explorer window and move it so that you can see of the desktop.
6) Find the Excel icon in Windows Explorer. Right-click and drag the item to the desktop, as shown in Fig. 65.
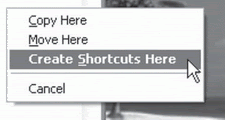
7) When you release the right mouse button, a menu will appear, as shown in Fig. 66. Choose Create Shortcuts Here.

2. Mở Explorer bằng phím Window +E.
3. Mở đến thư mục:
• Đối với Excel 2003: \Program Files\Microsoft Office\Office11
• Đối với Excel 2002: \Program Files\Microsoft Office\Office10
• Đối với Excel 2000: \Program Files\Microsoft Office\Office
4. Nếu Explorer đang ở tình trạng Maximize, nhấn nút Restore down ở góc trên bên phải cửa sổ
5. Dùng chuột kéo thu nhỏ cửa sổ Explorer sao cho bạn có thể thấy nền Desktop.
6. Tìm biểu tượng của file Excel.exe trong Explorer. Dùng chuột phải kéo và thả nó ra ngoài desktop.
7. Khi thả cút phải chuột, 1 menu con hiện ra, chọn Create Shortcut here.

Fig-64.gif


Fig. 64


Fig-65.gif


Fig. 65


Fig-66.gif


Fig. 66

40 of 853

8) Close Windows Explorer.
9) On the Desktop, right-click the new Shortcut to Excel icon and choose Properties.
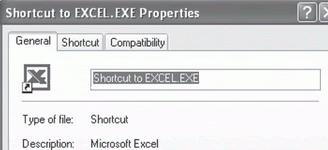
10) There are three tabs in the Properties dialog, as shown in Fig. 67. Choose the General tab.
11) Change the name in the top textbox to something meaningful. If this icon will be used to open the Sales file, a short name like Sales would work.
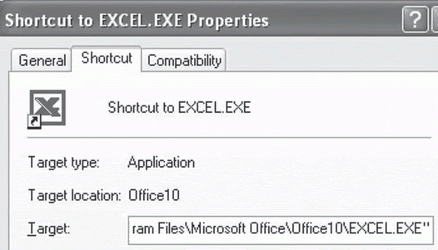
12) On the Shortcut tab, locate the Target field. This field contains the complete path and filename to EXCEL.EXE. The path and file name are wrapped in quotes. See Fig. 68.
13) The field is never big enough to display the entire path, so you must click in the field and hit the End key in order to see the end of the entry, as shown in Fig. 68.

8. Đóng Explorer.
9 Trên Desktop, click chuột phải vào biểu tượng mới tạo, chọn Property.
10. Có 3 tab trong Property. Chọn tab General.
11. Đổi tên shrtcut cho hình tượng hơn về file sẽ mở. Nếu biểu tượng sẽ dùng để mở file Sale.xls, hãy sửa tên lạ là Sales cho dễ hiểu.
12. Trong tab Shortcut, tìm ô Target. Ô này chứa đường dẫn đến file Excel.exe. Nguyên đường dẫn đặt trong dấu nháy kép “”
13. Ô đường dẫn này không đủ lớn để thấy hết đường dẫn. Hãy click chuột vào nó và nhấn phím End.

Fig-67.gif


Fig. 67


Fig-68.gif


Fig. 68
 
Lần chỉnh sửa cuối:
SET UP EXCEL ICONS TO OPEN A SPECIFIC FILE ON STARTUP
THIẾT LẬP CÁC BIỂU TƯỢNG CỦA FILE ĐỂ MỞ TỰ ĐỘNG. (tiếp theo) (quá 10,000 ký tự)

14) The startup switch should be added after the final quotation mark. Type a space, and then the startup switch. If you use multiple startup switches, each must be separated by a space.
• To open a file in read-only mode, use the /R switch followed by the complete path and file name, as shown in Fig. 69.
• To open a file in normal mode, leave out the /R switch. Just have a space followed by the path and file name, as shown in Fig. 70.
Gotcha: If you start Excel normally, use File – Open and browse to the C:\ folder. All subsequent Open or Save As dialogs will start in the C:\ folder. Frustratingly, neither of the above switches will change the current path to the folder as the open file. In order to do that, use the /P switch with the same path as your file, as shown in Fig. 71.

14. Ký hiệu / và tham số sẽ được thêm vào phía sau dấu nháy đôi. Gõ 1 ký tự trống, rồi đến ký hiệu / và tham số. Nếu bạn muốn dùng nhiều tham số, mỗi em phải cách nhau 1 ký tự trắng.
- Để mở file dưới dạng read only, gõ /R rồi tới đường dẫn đầy đủ tới file và tên file muốn mở.

Fig-69.gif


Fig. 69

- Để mở file bình thường, bỏ cái /R. Chỉ 1 khoảng trắng rồi tới đường dẫn tới file và tên file.

Fig-70.gif


Fig. 70

Ghi chú: nếu muốn mở Excel bình thường, Dùng menu File – Open rồi mở đến thư mục C:\. Mọi mệnh lệnh Open hay Save As sau đó sẽ chỉ đến thư mục này. Có sự bực mình là cả 2 cách mở file với tham số \R và không tham số đều không làm được như vậy: không thay đổi thư mục chỉ đến khi mở file. Để làm việc này, phải thêm tham số \P kèm với đường dẫn đến thư mục mở file.

Fig-71.gif


Fig. 71

Additional Details: Try the /E switch to suppress the Excel splash screen as your file opens.
Summary: Customize your shortcut to Excel to open a specific file or to use a specific path as the current folder.

Nói thêm: Thử dùng tham số /E để không cho mở màn hình khởi động của Excel.
Tóm tắt: Cài đặt tham số và thuộc tính cho 1 shortcut của Excel để mở 1 file định trước hay sử dụng đường dẫn định trước thành đường dẫn hiện tại cho Excel sử dụng khi Save As và Open
42 of 853
 
Lần chỉnh sửa cuối:
USE A MACRO TO FURTHER CUSTOMIZE STARTUP
DÙNG MACRO ĐỂ TỰ THIẾT LẬP SỰ KHỞI ĐỘNG EXCEL

Problem:
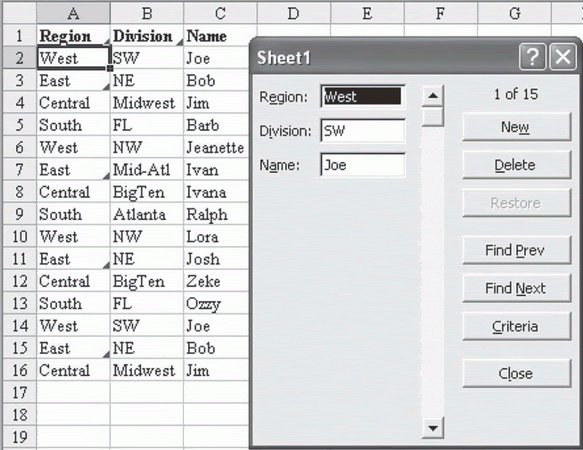
Every time that you open a workbook, you would like to put the file in Data Form mode, as shown in Fig. 72, or to invoke any other Excel menu as the file opens.
Strategy:
Startup switches can only do so many things. You will have to use a Workbook_Open macro in order to force Excel into Data Form mode. Follow these steps:
1) In Excel, go to Tools – Macro – Security. Set the security level to Medium or low.
2) Open your workbook.

Vấn đề: Mỗi khi bạn mở lên 1 bảng tính, bạn muốn mở 1 Data Form, như hình 72 hoặc muốn hiện lên bất kỳ 1 menu khi file đựơc mở.
Giải pháp: Quy trình khởi động thông thường chỉ làm 1 số việc. Bạn sẽ phải dùng 1 macro dựa trên sự kiện Workbook_Open để buộc Excel mở lên cái Data Form. Thực hiện các bước sau:
1. Trong Excel, vào Tools – Macro – Security. Thiết lập mức bảo vệ xuống Medium hoặc low.
2. Mở 1 file của bạn.

Fig-72.gif


Fig. 72


43 of 853

3) Hit Alt+F11 to open the VBA Editor. (Caution: The Microsoft Natural Multimedia keyboard does not support Alt+F keys. You might have to use Tools – Macros – Visual Basic Editor, instead.)
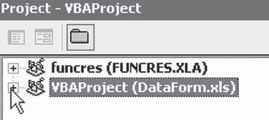
4) Hit Ctrl+R to show the Project Explorer in the upper left corner. You should see something that looks like VBAProject (Your Book- Name) in the Project Explorer, as shown in Fig. 73.

3. Nhấn Alter+F11 để mở cửa sổ viết code VBA. (Ghi chú: Một số bàn phím Microsoft Natural Mutimedia không chấp nhận các tổ hợp phím Alt+F. Bạn phải vào Tools – Macros – Visual Basic Editor)
4. Nhấn Ctrol+ R để mở khung project Explorer ở góc trên bên trái. Bạn sẽ thấy vài thứ như VBA Project (tên file đang mở) như hình 73

Fig-73.gif


Fig. 73


5) If there is a + to the left of this entry, hit the + to expand it. You will see a folder underneath, called Microsoft Excel Objects. If there is a + to the left of this entry, hit the + to expand it, also.
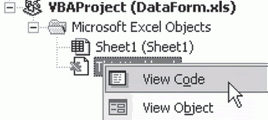
6) You will now see one entry for each worksheet, plus an entry called ThisWorkbook. Right-click on ThisWorkbook and choose View Code from the pop-up menu, as shown in Fig. 74.
7) Copy these three lines of code to the large white code window.

5. Nếu có 1 dấu cộng bên trái tên file, nhấn vào nó. Bạn sẽ thấy xổ xuống như 1 cây thư mục, gọi là Microsoft Excel Objects. Nếu có dấu cộng, lại nhấn nữa.
6. Giờ thì bạn thấy mỗi sheet có 1 mục nhỏ thêm 1 mục có tên ThisWorkbook. Nhấn chuột phải vào ThisWorkbook và cxhọn View Code, như hình 74
7. Sao chép 3 dòng lệnh VBA sau vào khung trắng lớn bên phải:

Mã:
[/FONT]  [FONT=Verdana]
[/FONT] [FONT=Verdana][COLOR=black]Private Sub Workbook_Open()[/COLOR][/FONT][FONT=Verdana]
[/FONT] [FONT=Verdana][COLOR=black]ActiveSheet.ShowDataForm[/COLOR][/FONT][FONT=Verdana]
[/FONT] [FONT=Verdana][COLOR=black]End Sub[/COLOR][/FONT][FONT=Verdana]
8) Hit Alt+Q to return to Excel.
9) Save the file.
10) Open the file. The data form should open.

8. Nhấn Alt+Q để trở về Excel.
9. Lưu file và đóng lại.
10. Mở file trở lại, Cái Data Form sẽ hiện ra.

Fig-74.gif


Fig. 74


44 of 853

Additional Information:
This simple macro invokes on Menu command. It is possible to build highly complex macros that would control literally anything. For a primer on macros, consult VBA & Macros for
Microsoft Excel from QUE.
Summary:
Customize your shortcut to Excel to open a specific file or to use a specific path as the current folder.

Thông tin thêm: Cái đoạn code đơn giản này có thể mở ra từ Menu Data. Bạn cũng có thể tạo những macro phức tạp hơn để thực hiện nhiều việc khác. Để biết về macros, nghiên cứu VBA& Macros cho Excel.
Tóm tắt: Dùng 1 macro dựa trên sự kiện Workbook_Open để buộc Excel thực hiện 1 số công việc ngay khi mở file.
Tóm tắt: Dùng macro để buộc Excel mở Data Form khi mở 1 file xác định.
 
Lần chỉnh sửa cuối:
Web KT
Back
Top Bottom